Serverless-Devs 实践——基于 Node 的前端 CICD
Serverless Devs 是一个开源开放的 Serverless 开发者平台,致力于为开发者提供强大的工具链体系。通过该平台,开发者可以一键体验多云 Serverless 产品,极速部署 Serverless 项目。本文介绍通过 Serverless-Devs 部署一个前端 CICD 系统。
自动将前端项目托管至阿里云对象存储平台,无需服务器及额外运维操作,并实现 CDN 访问加速。
方案架构:

如果您的开发环境没有 Serverless Devs,请参考Serverless Devs Install-tutorial进行安装。
本文档涉及本地调试,因此需要开发环境具有 Docker,您可根据您开发平台的不同安装不同版本,可参考Serverless Devs Install-tutorial可选部分。
- 本文档基于 Github 进行实践,因此不保证在其他代码托管平台的可用性,您可以根据您具体使用的代码平台的 webhook 参数对本文代码进行修改。您需要准备一个前端项目以便进行下一步,本文准备了serverless-cicd-example-vue便于实践
- 创建密钥对并绑定到 github,可参考使用 SSH 连接到 GitHub - GitHub Docs
前往RAM 访问控制创建一个子用户,赋予其对象存储服务权限「AliyunOSSFullAccess」及管理函数计算 (FC) 服务权限「AliyunFCFullAccess」并创建 AccessKey。

前往OSS 管理控制台开通对象存储服务,并创建一个 Bucket,Bucket 名称为 serverless-cicd,存储地域为华南 1(深圳),其他参数为默认值。您可以选择不同的地域及 Bucket 名称,但需要对代码进行相应修改
前往函数计算控制台开通函数计算服务,请注意,函数计算服务分服务地域进行管理,您可能需要切换地域才能查看相应的服务及函数。
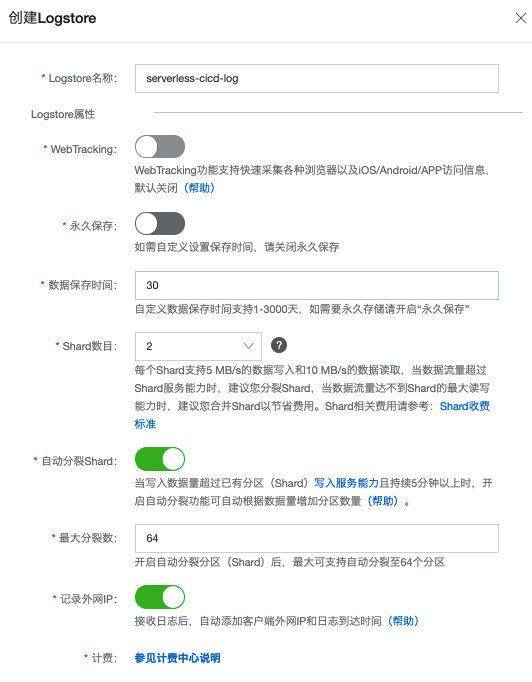
前往日志服务开通日志服务,并创建一个名为 serverless-cicd-log 的 Project,创建成功后会提示是否创建 logStore,我们选择确认。


logStore 我们填写名称,其他保持默认。
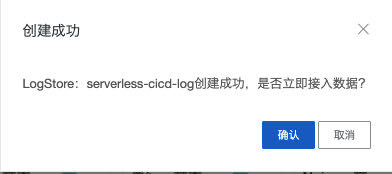
创建成功后会提示是否立即接入数据,我们选择取消。
参考配置阿里云密钥及S config,将前文添加的子用户 AccessKey 配置到 S 中。
执行s init来创建项目,我们选择Alibaba Cloud Serverless ➡️ HTTP Function-Node.js 12 Example ➡️ 输入文件夹名称。
注意双##注释内容与项目生成配置文件的差异,主要有增加日志配置,修改超时时长以及修改 http 触发器合法请求方式:
s.yamlservices:
  fc-deploy-test: #  服务名称
    component: devsapp/fc # 组件名称
    props: #  组件的属性值
      region: cn-shenzhen ## 此处可不修改
      service:
        name: fc-deploy-cicd
        description: 'demo for fc-node-cicd component'
        internetAccess: true
        ## 增加日志配置
        logConfig:
          enableRequestMetrics: true
          logstore: serverless-cicd-log
          project: serverless-cicd-log
      function:
        name: http-trigger-function
        description: this is a test
        runtime: nodejs12
        codeUri: ./
        handler: index.handler
        memorySize: 128
        timeout: 180 ## 增加时长,避免因为网络问题超时
      triggers:
        - name: httpTrigger
          type: http
          config:
            authType: anonymous
            methods:
              - GET
              - POST ## Github Webhook 为 POST 方式
      customDomains:
        - domainName: auto
          protocol: HTTP
          routeConfigs:
            - path: /*
              methods:
                - GET
通过执行yarn add ali-oss或npm install -s ali-oss 安装阿里云 OSS SDK
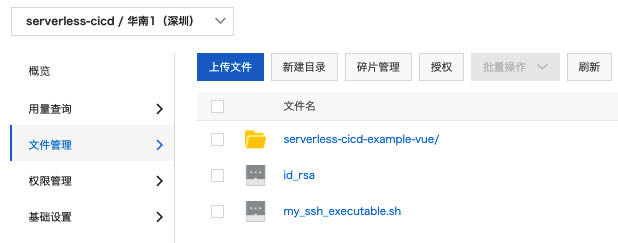
上传名「id_rsa」的私钥文件 (绑定到 Github 的 SSH 密钥) 及名为「my_ssh_executable.sh」的脚本文件到对象存储桶根目录下
my_ssh_executable.sh#! /bin/sh
ID_RSA=/tmp/id_rsa
exec /usr/bin/ssh -o StrictHostKeyChecking=no -i $ID_RSA "$@"

index.jsconst getRawBody = require('raw-body')
const getFormBody = require('body/form')
const body = require('body')
const execSync = require('child_process').execSync
const oss = require('ali-oss')
const fs = require('fs')
const path = require('path')

exports.handler = async (req, resp, context) => {
  // 设置响应类型
  resp.setHeader('Content-type', 'application/json')

  const client = new oss({
    region: 'oss-cn-shenzhen', // 根据实际设置填写
    accessKeyId: '<Your accessKeyId>',
    accessKeySecret: '<Your accessKeySecret>',
    bucket: 'serverless-cicd',
  })

  async function get(filename, localpath, cmd) {
    try {
      let res = await client.get(filename, localpath)
      if (res.res.status == 200) execSync(`${cmd} ${localpath}`)
    } catch (e) {
      console.error(e)
    }
  }
  // 下载密钥及脚本
  get('id_rsa', '/tmp/id_rsa', 'chmod 0600')
  get('my_ssh_executable.sh', '/tmp/my_ssh_executable.sh', 'chmod +x')

  console.log('下载密钥和脚本完成')

  // 获取 webhook 提交的推送信息
  getRawBody(req, async function (err, body) {
    body = body.toString().replace('undefined', '",')
    body = JSON.parse(body)
    const ref = body.ref
    const ref_type = body.ref_type
    const repository_name = body.repository.name
    const clone_url = body.repository.clone_url

    if (ref_type != 'tag') {
      resp.send('No tag event')
      return 0
    }

    // 删除可能存在的代码,并重新克隆
    if (fs.existsSync(`/tmp/${repository_name}/`)) execSync(`rm -rf /tmp/${repository_name}`)
    gitclone = `GIT_SSH="/tmp/my_ssh_executable.sh" git clone -b ${ref} ${clone_url} /tmp/${repository_name}`
    try {
      execSync(gitclone)
      console.log('克隆完成')
    } catch (e) {
      resp.send('git clone fail')
    }

    // 执行自定义的打包脚本
    // execSync(`cd /tmp/${repository_name} && sh build.sh`)

    function getFilesList(dir) {
      let res = []
      let files = fs.readdirSync(dir)
      files.forEach((filename) => {
        if (filename[0] == '.') return
        let filepath = path.join(dir, filename)
        let info = fs.statSync(filepath)
        if (info.isFile()) res.push({ filename, filepath })
        else res = res.concat(getFilesList(filepath))
      })
      return res
    }

    // 获取文件列表
    const files = getFilesList(`/tmp/${repository_name}/`)
    // 遍历上传文件
    Promise.all(
      files.map((file) => {
        return new Promise(async (resolve) => {
          let res = await client.put(file.filepath.replace(`/tmp`, ``), file.filepath)
          resolve(`${file.filename} uploading: ${res.res.status == 200}`)
        })
      })
    ).then((r) => {
      console.log(r)
      resp.send(
        JSON.stringify({
          ref,
          ref_type,
          repository_name,
          clone_url,
        })
      )
    })
  })
}
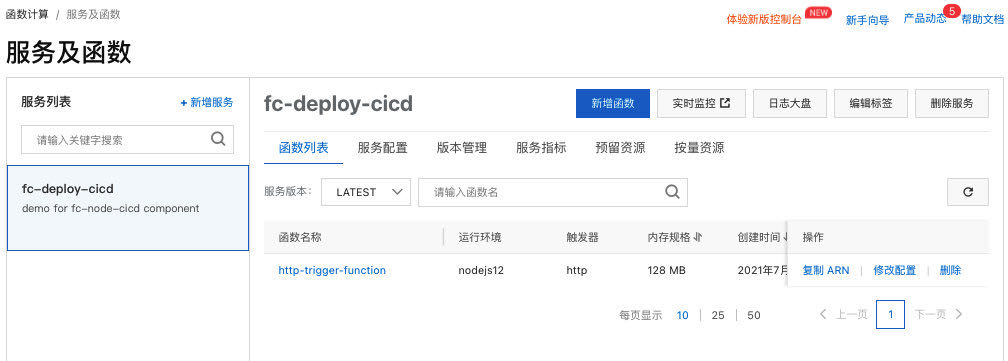
执行s deploy一键部署,通过控制台可以查看到部署结果
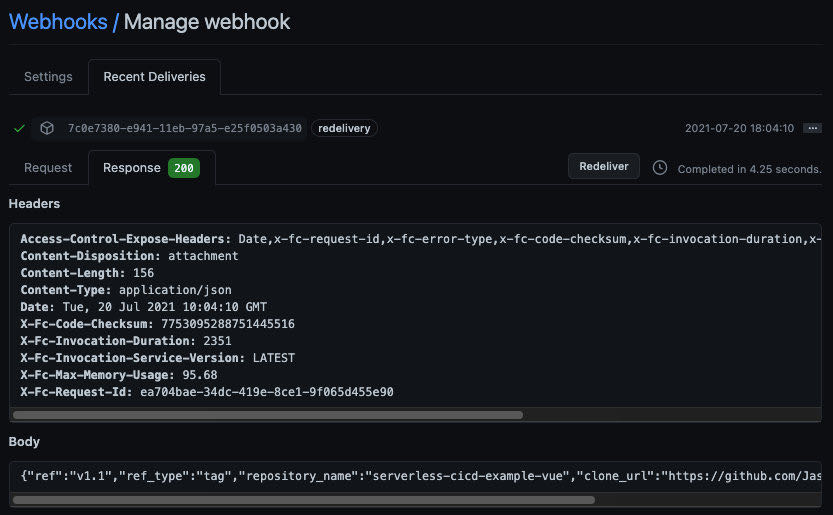
进入 GitHub 前端仓库 ➡️ Settings ➡️ Webhooks:
- payload:触发器路径,可复制命令行输出或到控制台查看
- Content type:application/json
- events:仅勾选 ☑️ Branch or tag creation
cd frontend-project-dir
git tag v1.0 -m 'new version'
git push origin tag v1.0